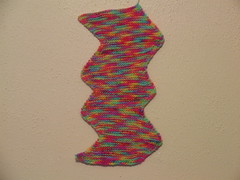
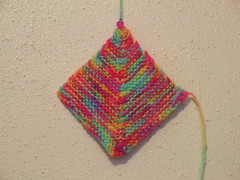
Well, no one correctly guessed the mystery item. I should have been kinder and included some kind of relative size thing - the piece is actually only about 8 inches or so long. Does that change your ideas? Watch this space...
A little while ago, Vicki gave me some amazing DK yarn. She'd enjoyed playing with it, but found it a bit strident and overpowering, and asked if I had any ideas on calming it down. She has a good point - we're talking neon variegated here:

This really doesn't do justice to the true eye-poppingness of the colours. The first thing we both knew about this yarn was how much it cheered up a dull Spring day - it makes you smile just to use it. But it had its problems.
First step was to see how it was in stocking stitch:
Like a lot of commercial yarns, the rigidly repeating colour changes make the colours tend to pool and stripe, even on a small swatch like this (about 4 inches square, on 4mm needles). The problem is, how to interrupt these sequences so that the effect is more mottled - and how to tone down the colours.
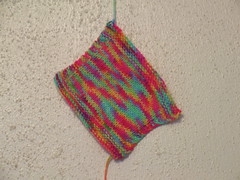
First of all, garter stitch - and this is where the mystery item comes in. Garter stitch breaks up the pooling somewhat because of the structure of the stitch. It's as if you can see the bumps and the v's of the stitches on the same side, instead of them being kept to one side each in stocking stitch:
If you compare this with the stocking stitch swatch, you'll see that the colours, while still being grouped together to some extent, are starting to look a little less regimented and more random.
So what is it?
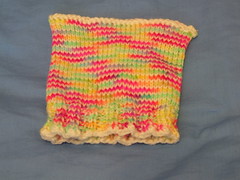
It's a baby hat:
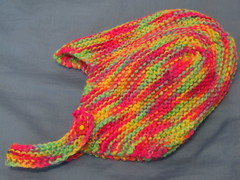
Isn't it fab?? Mum has been telling me for years about this pattern, which she knitted for loads of family children in the war years. It takes very little yarn, despite being in garter stitch, and is really fun to make. I finally found it reprinted by Sirdar in an early 70s pattern leaflet. So how does the strip become the hat? Simple - seam the top and bottom of the piece together, then sew each left-hand point to its neighbour. The right hand points become the 'cheeks' and peaked front of the hat. Then you knit a strap, find a button, and hey presto! One cute hat. I love it :)
Next I decided to try double-thickness knitting, the technique where you knit and slip alternately all the way along the first row, then slip and knit all the way back along the second, to produce a little 'bag' of knitting without circular needles or dpns. (Although there's an excellent article in Knitty about making a pair of socks with this method, using dpns - just like the woman in 'War and Peace'!)
Vicki has written a lovely pattern for an iPod cosy using this technique, so I tried it out:
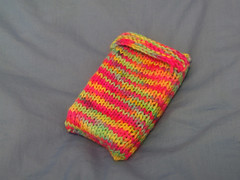
This was odd, because I expected it to interrupt the colour changes altogether - instead of which, they ran round the entire pattern. And so, I should have realised, they were bound to do - it's a single piece of knitting, after all!
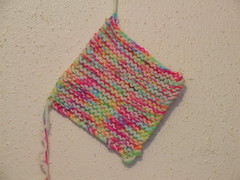
Looking for something that would really shake the colours up, I tried a mitre square:
This had a very interesting outcome, much more the kind of thing I was looking for. For an excellent tutorial on mitre squares, see Planet Shoup.
Now, how to tone it down? That bit was easy. Work it together with cream yarn of the same weight, in garter stitch on 6mm needles:
This has the immediate effect of diluting the colour. The stitch structure shows bits of cream yarn alongside bits of neon yarn, tricking our eyes into reading the whole thing as a paler version of the neon yarn. And, of course, being garter stitch, it disrupts the colour changes a little. (It's also a quick and easy way to make a thicker, springier fabric - it really is quite wonderfully squishable!)
Finally I tried a technique I found in The Knitting Answer Book (which I cannot recommend too highly. I only wish I were on commission). It's called helical knitting, or spiral knitting, because - you guessed it! - it's made in a spiral. Of course, all knitting worked in the round is a spiral, which is why we get the problem of the colour jog, but this technique actually capitalises on that instead of trying to fight against it.
You begin by casting on however many stitches you need, onto a circular needle or dpns. DO NOT join the round. Turn the work, attach the second yarn to the needle (you will now have two cast-on ends of yarn at the same end of the needle) and purl back in your second colour. You now have one row of each colour, with the working yarns both hanging at the same end. Pick up your first yarn and, without twisting the two yarns together, join the round and begin knitting. At the end of the round, swap to your second colour. Carry on till you're bored, work a 1x1 rib (still working alternate rounds in each colour), cast off, seam the top and you're holding a baby hat with no colour jogs. Honestly. It's like magic, do try it yourself.
I love learning new techniques :)
For the same reason as on the iPod cosy, the colours still tend to follow each other round the hat - but, for the same reasons as on the garter stitch square, they're also diluted by the cream and don't seem so strong anyway.
So there you go. A few ideas on the taming of wild yarns. I hope it's been helpful, because it's been lots of fun for me, and has brightened up several dull days. You can't knit with yarn like this and not feel happy :)
Now, especially for Tracey, two pictures of the beehive yarn holder. These used to be really common, but they're out of production now and can only be found on eBay and suchlike places. Because they're made of Bakelite, they're quite fragile (note the crack on the base of mine, where I knocked it from a table onto a wooden floor!), so they don't survive as well as some other designs:

It's about 5 inches high; the bigger hole on the top is for yarn, while the other two are for a ribbon handle (I took mine off because it was making an irritating noise against the yarn inside!). It's about four inches diameter at the base, so you can't put huge balls of yarn in it. It's the shape of an old-fashioned straw beehive (weren't they called 'skeps'?), but I don't know whether it was a promotional item for Patons Beehive yarn - there's no printing on it to tell me. There is a helpful needle gauge on the base, though:

Spot the crack, on the left!
The base screws off, you put the ball in, thread the end through the top, and screw the base back on. It's brilliant for stopping yarn rolling around, but you can't always see when you're nearing the end of a ball.
Well, this has been a bit of a marathon. It's taken me most of two days to put this together, so don't expect another post too soon :) Off to have a rest and a nice cup of tea.
Tigger says, "Does that mean I get biscuits?"
4 comments:
Thank you very much for the the pictures and explanation!
All those techniques, must have been really exciting to see the effects they produce. Great ideas, keep 'em coming!
That was a good write-up and interesting to see all the swatches and techniques. The baby hat design is brilliant.
Just discovered your blog and luv it!!! Please keep up the good work, allowing for illness, chocolate cravings and Tigger attacks of course. And that baby hat is so cool!
That spiral knitting thing is genius. Thanks!
Post a Comment