Merlin is becoming more devious and mischievous with every passing day.
Not content with every knitted case I've made for things in the past year, his mousie, his tassel, and various paper balls, he has become a sneak thief.
Wondering where one of my mascots has gone, I find it under my bed, distinctly soggy, and ragged round the edges.
I sit quietly with my knitting (not often, granted, but I do get the chance sometimes), minding my own business - and a little paw comes snaking onto the table, and steals my notions bag.
I put my knitting down, and a black streak shoots past and disappears with my ball of yarn.
Yarn retrieved, I go to pick up my knitting again - only to find he's had that away, too.
And this week, I have had to transfer my imminent-project yarn from the lovely lavender tote, in which it has sat unmolested for several years (not always the same yarn, I hasten to add - although, come to think of it....), into a zipped holdall, because Someone has discovered he can hop up next to it, and find a huge supply of new woolly balls.
He looked very indignant when I zipped the holdall and stopped his games, but there's a limit to how long I can watch my precious hand-dyed, hand-spun goodies disappearing out of the door and down the corridor, trailing between his scampering feet - and it's about 0.1 of a second.
Poor Merlin. As we say to him countless times a day - 'It's a good job you're cute'....
Tuesday, March 31, 2009
Tuesday, March 24, 2009
Scrunchie doll
I'm feeling pretty brain-dead today - I enjoyed a Quaker Meeting for Worship at my home on Sunday, but it wiped me out yesterday (hence the lateness of this entry), and I'm about at the end of my energy today - so I'm giving you another free pattern.
This one is from SlipKnot issue 112 (June 2006), and gives a cute and very kitsch way for little girls to store their hair scrunchies - as a tutu on a little ballerina.
You need some kind of small doll for this - I used an Impkins doll which I bought on eBay.
Although I give a scrunchie pattern here, there are loads online. Try Crochet Pattern Central (always a good source of crochet patterns), or the Ravelry pattern search.
Because there are so many suitable small dolls available, this is more of a guideline than a pattern!
You will need a small amount of plain yarn and a scrap of ribbon for the body, and a hair elastic and some eyelash yarn for the scrunchie. Use needles and hooks which are suitable for the yarn you choose.
Using the plain yarn, cast on enough stitches to go around half the body, with a provisional cast on. Work in stocking stitch for length needed to gusset.
Decrease 1 st each end of the next 4 rows, then increase 1 st each end of following 4 rows.
Work up the back straight for the same length as the front, and do not cast off.
Undo the provisional cast on, and thread a thin ribbon through the stitches. Put the strip of knitting in place on the doll, and thread the ribbon through the last row of stitches. Pull up and tie in a bow.
To make a crochet garment, work in double crochet (US - treble crochet), following the instructions above. Thread the yarn through the stitches in the first and last rows.
To make the scrunchie, I used an oddment of eyelash yarn, which makes it very fluffy and full:
UK version:
Round 1: dc closely around the elastic band and sl st closed.
Round 2: (ch4, miss 1 dc, dc into next dc) to end, then (2ch, 1 tr) to close.
Round 3: (ch6, dc in next ch4 loop) to end, (ch6, sl st) to close.
US version:
Round 1: tr closely around the elastic band and sl st closed.
Round 2: (ch4, miss 1 tr, tr into next tr) to end, then (2ch, 1 dtr) to close.
Round 3: (ch6, tr in next ch4 loop) to end, (ch6, sl st) to close.
This one is from SlipKnot issue 112 (June 2006), and gives a cute and very kitsch way for little girls to store their hair scrunchies - as a tutu on a little ballerina.
You need some kind of small doll for this - I used an Impkins doll which I bought on eBay.
Although I give a scrunchie pattern here, there are loads online. Try Crochet Pattern Central (always a good source of crochet patterns), or the Ravelry pattern search.
Because there are so many suitable small dolls available, this is more of a guideline than a pattern!
Scrunchie Doll
You will need a small amount of plain yarn and a scrap of ribbon for the body, and a hair elastic and some eyelash yarn for the scrunchie. Use needles and hooks which are suitable for the yarn you choose.
Using the plain yarn, cast on enough stitches to go around half the body, with a provisional cast on. Work in stocking stitch for length needed to gusset.
Decrease 1 st each end of the next 4 rows, then increase 1 st each end of following 4 rows.
Work up the back straight for the same length as the front, and do not cast off.
Undo the provisional cast on, and thread a thin ribbon through the stitches. Put the strip of knitting in place on the doll, and thread the ribbon through the last row of stitches. Pull up and tie in a bow.
To make a crochet garment, work in double crochet (US - treble crochet), following the instructions above. Thread the yarn through the stitches in the first and last rows.
To make the scrunchie, I used an oddment of eyelash yarn, which makes it very fluffy and full:
UK version:
Round 1: dc closely around the elastic band and sl st closed.
Round 2: (ch4, miss 1 dc, dc into next dc) to end, then (2ch, 1 tr) to close.
Round 3: (ch6, dc in next ch4 loop) to end, (ch6, sl st) to close.
US version:
Round 1: tr closely around the elastic band and sl st closed.
Round 2: (ch4, miss 1 tr, tr into next tr) to end, then (2ch, 1 dtr) to close.
Round 3: (ch6, tr in next ch4 loop) to end, (ch6, sl st) to close.
Monday, March 16, 2009
Merlin!
Well, we certainly know we have another cat!
It's not just the talking, or the thundering down the hall like a herd of elephants, or even the destructiveness - it's his absolutely unshakeable belief that, whatever we are doing, we cannot possibly accomplish it unless he helps. My books all have teeth marks. My yarn has all had to be securely fastened into containers he can't open - and he's already working on zips. I had to abandon half a yoghurt today because I couldn't get my spoon past his head.
He has a fascination for anything knitted. So far he has abducted my inhaler bag (complete with inhaler - we can't find it anywhere), my glasses case and my MP3 player cosy. He throws them around, drags them into a corner, and then growls over them.
I can't knit or crochet, because he drops onto my chest every time I start, and tries to run away with my project. He chews my hair, claws my chin, and makes my arm ache by refusing to sleep in any other position than draped over my elbow.
And you know what?
I wouldn't change him for the world :))
He makes me laugh so much, especially when Richard gets him chasing the laser pointer. He has woken Chloe up and given her a new lease of life - they play together several times a day, and seem to get on amazingly well. And he is the softest, cuddliest kitten I've had apart from Tigger (and let's face it, Tigger was a one-off). He has us wound quite securely around his huge black paw, and he knows it :)
Richard has photos and two video clips at his Flickr site, but this is my favourite:
Merlin says: 'So, let's see - inhaler bag, check; catnip mouse, check; Mum's ability to say no to me, check...'
Monday, March 09, 2009
Extra, extra! - revisited
I wrote on Monday:
I've now got my copy of Simply Knitting 51, and I notice the sizes on Spring Leaves, the lace tunic, have been recalculated. I designed it for sizes 16 to 30, and it's been printed for 12 to 20.
I have no huge problems with this - it's their magazine, they're entitled to edit things to fit in better - but I thought it would be nice to reprint here the original pattern, for larger sizes. For copyright reasons, this is not the entire pattern - you will still need to buy the magazine for the stitch patterns. I don't want to break my contract, just provide some extra information...
It seems I posted a little hastily - what the magazine has done is relabel the sizes, not recalculate them, and so the pattern I published here is actually the same as the one in the magazine.
The editor assures me that the top I supplied as a 16 actually fitted a 12 perfectly, and was too small for a 14. That means that the pattern as written would actually fit the sizes with which the magazine labelled it. What happened I'm not quite sure - but obviously, for some reason, my tension measurements were out. Please take this as an example of the importance of measuring gauge accurately!
Thus I've taken down the pattern. The offer for the lace charts still stands, however, and if anyone would like the pattern in a larger size, let me know and I'll work it out for you.
As a footnote, I have received a pdf from Simply Knitting of my design in issue 53, which will fit bust sizes of 38 to 56 inches, and it looks wonderful. I hope you'll like it too.
Tuesday, March 03, 2009
Merlin
Here's the first photo of the darling boy, taken at the foster home. He hasn't stopped moving for long enough for a photo here yet :)
Chloe was mildly interested, and then stalked off in disgust.....
Monday, March 02, 2009
Good news, good news, and more good news!
I had a rotten week last week, for several reasons (including a replacement carer breaking my CD player and lying about it - that's sorted now, though), and I really needed some good news. Well, I've had it, in bucketsful!
First I found out that one of my patterns had been published in Simply Knitting 51 - I don't know where my contributor's copy went, but it will be nice to see it anyway (a kind fellow Raveler is sending me her copy). It's my favourite of the plus-size patterns, a lace tunic in Artesano Alpaca:
The lace pattern is the Beech Leaf lace pattern from Mary Thomas' Book of Knitting Patterns, and the bodice is garter stitch. There's a band of something called Star Stitch, also from Mary Thomas, at the empire line/start of the bodice.
I've also heard that a sleeveless jacket/gilet thing I made in Rowan Tapestry will be featured in issue 53. It's lovely to see all these items finally hitting the pages. I finished them all quite a while ago, but have had to wait for them to fit a theme before I see them in print.
On Friday I finally managed to find a sewing machine on Freecycle. I have been putting in claims for a while, and not being successful, and even putting in my own 'Want' ads hasn't helped. This time, though, I actually had two offers, and I am now the happy owner of a very lovely Jones electric machine - nothing wrong with it that a little cosmetic cleaning won't solve!
And the best news of all - we think we have found our kitten. Chloe has been so clingy and vocal that I finally realised she was actually missing Tigger much more than I thought, so we decided to get a new kitten which would, perhaps, stop her fretting. It took a long time to find one. Now that people spay and neuter their cats (hurrah for responsible pet owners!), there are a lot fewer unwanted kittens around. However, I have just been speaking to an RSPCA foster mum, who wants us to come and see Merlin tomorrow, to see if we like each other.
He is a black Siamese cross, about 12 weeks old, big paws, bat ears, flat nose - and very vocal! He has had his first vaccinations, but is happy to be a house cat (phew - I hated it every time Tigger went out!). He loves other cats, dogs, and especially people, and when he gets tired he snuggles down and sucks his blankie.... (She thinks he was probably taken too early from his mum.)
Richard is going to meet him and, hopefully, fetch him home tomorrow. Photos to follow. Please cross your fingers for us....
Monday, February 23, 2009
Daisy, Daisy
Another freebie, in my quest to make all my free patterns more widely accessible on Ravelry - and to everyone who reads this blog :)
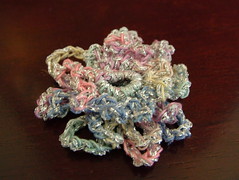
I designed this little flower as an ornament for a Christmas parcel, at a friend's request. I liked it enough to submit it to SlipKnot, the journal of the Knitting and Crochet Guild.
You could also use it as an embellishment on a hat, bag, cushion etc, or attach a hair-slide or brooch pin to the back. It also works pretty well as a pen topper, but you may need a dab of glue to help it stay in place, depending on your gauge.
It's worked by crocheting twice into the same round - once into the front loops, then back round again into the back loops. You can create a bigger flower if you wish, by adding 4ch to the loops of each extra odd-numbered round, but the back of the flower does become quite thick, quite quickly.
DAISY, DAISY


MATERIALS
ABBREVIATIONS
beg - beginning
ch – chain
ss – slip stitch
sc - single crochet
dc – double crochet
FL - front loop
BL - back loop
Round 1: Ch 6, ss to close
Round 2: Ch1, dc into same space, 7 dc into ring, ss to 1st ch. (8dc)
Round 3: FL only - ss in first FL, ch6, ss in same loop, [ss into next FL, ch 6, ss into same loop] in remaining loops. (8 ch-6 loops)
Round 4: BL only, working into the back loops immediately behind front loops used in previous row - ch1, dc in each BL to end, ss into 1st ch. (8dc)
Round 5: FL only, working into the front loops of the dc created in previous row - ss in first FL, ch10, ss in same loop, [ss into next FL, ch 10, ss into same loop] in remaining loops. (8 ch-10 loops)
Round 6: Rpt row 4.
Round 7: FL only, working into the front loops of the dc created in previous row - ss in first FL, ch14, ss in same loop, [ss into next FL, ch 14, ss into same loop] in remaining loops. (8 ch-14 loops)
Fasten off and sew in ends. Ease petals into shape.
Round 1: Ch 6, ss to close
Round 2: Ch1, sc into same space, 7 sc into ring, ss to 1st ch. (8sc)
Round 3: FL only - ss in first FL, ch6, ss in same loop, [ss into next FL, ch 6, ss into same loop] in remaining loops. (8 ch-6 loops)
Round 4: BL only, working into the back loops immediately behind front loops used in previous row - ch1, sc in each BL to end, ss into 1st ch. (8sc)
Round 5: FL only, working into the front loops of the sc created in previous row - ss in first FL, ch10, ss in same loop, [ss into next FL, ch 10, ss into same loop] in remaining loops. (8 ch-10 loops)
Round 6: Rpt row 4.
Round 7: FL only, working into the front loops of the sc created in previous row - ss in first FL, ch14, ss in same loop, [ss into next FL, ch 14, ss into same loop] in remaining loops. (8 ch-14 loops)
Fasten off and sew in ends. Ease petals into shape.
Use any thread or yarn and an appropriately-sized hook to the yarn or thread you use. The size of the decoration will vary with the size of the fibre used.
For the example illustrated (about 2"/5cm diameter), I used a size 10 crochet thread held together with a strand of Twilley’s Goldfingering in Silver, worked with a 4mm (G) hook.
ABBREVIATIONS
beg - beginning
ch – chain
ss – slip stitch
sc - single crochet
dc – double crochet
FL - front loop
BL - back loop
INSTRUCTIONS - British terminology
Round 1: Ch 6, ss to close
Round 2: Ch1, dc into same space, 7 dc into ring, ss to 1st ch. (8dc)
Round 3: FL only - ss in first FL, ch6, ss in same loop, [ss into next FL, ch 6, ss into same loop] in remaining loops. (8 ch-6 loops)
Round 4: BL only, working into the back loops immediately behind front loops used in previous row - ch1, dc in each BL to end, ss into 1st ch. (8dc)
Round 5: FL only, working into the front loops of the dc created in previous row - ss in first FL, ch10, ss in same loop, [ss into next FL, ch 10, ss into same loop] in remaining loops. (8 ch-10 loops)
Round 6: Rpt row 4.
Round 7: FL only, working into the front loops of the dc created in previous row - ss in first FL, ch14, ss in same loop, [ss into next FL, ch 14, ss into same loop] in remaining loops. (8 ch-14 loops)
Fasten off and sew in ends. Ease petals into shape.
INSTRUCTIONS - American terminology
Round 1: Ch 6, ss to close
Round 2: Ch1, sc into same space, 7 sc into ring, ss to 1st ch. (8sc)
Round 3: FL only - ss in first FL, ch6, ss in same loop, [ss into next FL, ch 6, ss into same loop] in remaining loops. (8 ch-6 loops)
Round 4: BL only, working into the back loops immediately behind front loops used in previous row - ch1, sc in each BL to end, ss into 1st ch. (8sc)
Round 5: FL only, working into the front loops of the sc created in previous row - ss in first FL, ch10, ss in same loop, [ss into next FL, ch 10, ss into same loop] in remaining loops. (8 ch-10 loops)
Round 6: Rpt row 4.
Round 7: FL only, working into the front loops of the sc created in previous row - ss in first FL, ch14, ss in same loop, [ss into next FL, ch 14, ss into same loop] in remaining loops. (8 ch-14 loops)
Fasten off and sew in ends. Ease petals into shape.
Tuesday, February 17, 2009
A Fine Vintage
Sorry this is a day late. I had a lovely but exhausting day on Sunday and so spent most of Monday asleep!
I'm developing more and more interest in vintage knitting patterns, and, as I know I'm not alone in this, I thought I'd share some of my favourite links.
The main things to bear in mind with vintage patterns are that
However, there are plucky souls out there who are decoding the patterns and making them much more accessible for modern knitters.
For the original publications, as well as actual paper patterns and books, I use two online sources of public domain textile books : Project Gutenberg, which has an entire Craft Shelf full of textile books; and the Antique Pattern Library.
There are also individual free vintage patterns available such as those on the Vintage Purls blog, and the 1940s patterns on the V&A website.
Some bloggers have taken on an entire book, or a whole lace sampler, and resolved to decode and rework every pattern for modern knitters. The best that I have come across are FitterKnitter, who is slowly working her way through a book from 1897 called The Art of Knitting, and Kathleen, who is reworking an 1884 lace sampler book. Her notes on antique terminology are very useful, and she explains things very clearly. Both of these bloggers provide charted and written instructions.
Well, that's it from me. Not very entertaining, but I hope it was useful - and next week I will be rested and back to my usual self, fingers crossed ;)
I'm developing more and more interest in vintage knitting patterns, and, as I know I'm not alone in this, I thought I'd share some of my favourite links.
The main things to bear in mind with vintage patterns are that
- they rarely supply a gauge measurement
- much of the terminology is different from modern terminology
- vintage sizes are often much smaller than modern ones!
However, there are plucky souls out there who are decoding the patterns and making them much more accessible for modern knitters.
For the original publications, as well as actual paper patterns and books, I use two online sources of public domain textile books : Project Gutenberg, which has an entire Craft Shelf full of textile books; and the Antique Pattern Library.
There are also individual free vintage patterns available such as those on the Vintage Purls blog, and the 1940s patterns on the V&A website.
Some bloggers have taken on an entire book, or a whole lace sampler, and resolved to decode and rework every pattern for modern knitters. The best that I have come across are FitterKnitter, who is slowly working her way through a book from 1897 called The Art of Knitting, and Kathleen, who is reworking an 1884 lace sampler book. Her notes on antique terminology are very useful, and she explains things very clearly. Both of these bloggers provide charted and written instructions.
Well, that's it from me. Not very entertaining, but I hope it was useful - and next week I will be rested and back to my usual self, fingers crossed ;)
Monday, February 09, 2009
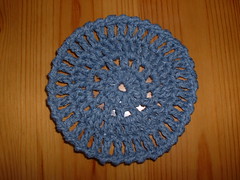
Spokes Coaster
Well, the Ruffled Flower has been a hit on Ravelry - so far it has been favourited 27 times and queued 7 times! OK, so it's no Clapotis, but that's a lot for one of my patterns :)
Comic Relief launched the 2009 Red Nose Day a few days ago, and a UK-based crafting forum called Crafteroo has opened a shop on Folksy to raise money for it. All items have been donated by the crafters, and Folksy has agreed to waive the fees so that all proceeds will go straight to Comic Relief.
I have given permission for all of my patterns to be used to make fundraising items, and I thought it would be useful to reprint here one that originally appeared in SlipKnot, the journal of the Knitting and Crochet Guild.
MATERIALS
To make a coaster 4" (10cm) diameter, I used a small amount of Aunt Lydia's Denim and a 4mm (G) hook. Thicker thread or yarn will make bigger coasters, thinner thread smaller ones. Two thin threads of contrasting colour held together makes a very pretty effect.
ABBREVIATIONS
beg - beginning
ch – chain
ss – slip stitch
sc - single crochet
dc – double crochet
tr – treble crochet
INSTRUCTIONS - British terminology
Foundation: Ch6, ss into first ch to form ring.
Row 1: 3ch to act as first tr, 11 tr into ring, ss into 3rd of beg ch (12 tr)
Row 2: Ch 4 to act as first (tr, ch1), then (tr, ch1) in each tr around. Join with ss to 3rd of beg ch (12 tr, 12 ch1 spaces)
Row 3: Ss into first ch1 space, 3ch as first tr, 2 more tr in same space, (3tr in each ch1 space) around, ss to 3rd of beg ch (36 tr)
Row 4: Repeat row 2 (36 tr, 36 ch1 spaces).
Row 5: Either reverse dc (crab stitch) or plain dc into each ch1 space. (36 dc). Crab stitch gives a neat rolled edge.
Alternative row 5: Ss into first ch1 space, ch1, dc in same space, 3ch, (dc into next ch1 space, 3ch) all the way around to last space, ss into first dc.
Finish off. Weave in ends.
INSTRUCTIONS - US terminology
Foundation: Ch6, ss into first ch to form ring.
Row 1: 3ch to act as first dc, 11 dc into ring, ss into 3rd of beg ch (12 dc)
Row 2: Ch 4 to act as first (dc, ch1), then (dc, ch1) in each dc around. Join with ss to 3rd of beg ch (12 dc, 12 ch1 spaces)
Row 3: Ss into first ch1 space, 3ch as first dc, 2 more dc in same space, (3dc in each ch1 space) around, ss to 3rd of beg ch (36 dc)
Row 4: Repeat row 2 (36 dc, 36 ch1 spaces).
Row 5: Either reverse sc (crab stitch) or plain sc into each ch1 space. (36 sc). Crab stitch gives a neat rolled edge.
Alternative row 5: Ss into first ch1 space, ch1, sc in same space, 3ch, (sc into next ch1 space, 3ch) all the way around to last space, ss into first sc.
Finish off. Weave in ends.
UPDATE: AUGUST 2012
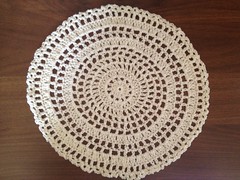
A fellow Raveler asked me if I could work out how to expand the coaster into a doily and, after a certain amount of messing about and swearing, I am delighted to say that I can.
I worked this with thread - unfortunately the thickness was not given on the wrapper, but it was equivalent to a fingering weight, or between 3 and 4 ply. I used a 3mm hook. The final measurement was just over 12" diameter, or approximately 30cm. This used 45g/225m of thread (1.6 oz/246 yds).
The instructions are the same for both UK and US terminology, as all you have to do is work round 2 and round 3 from the coaster pattern.
DOILY INSTRUCTIONS
Rounds 1-3: Work the coaster pattern to the end of Round 3.
Rounds 4-7: Work Coaster Round 2 four times.
Round 8: Work Coaster Round 3 once.
Rounds 9-10: Work Coaster Round 2 twice.
Round 11: Work Coaster Round 3 once.
Round 12: Work Coaster Round 2 once.
Round 13: Work Coaster Round 5, or the alternative Coaster Round 5 (which is the version I used).
Monday, February 02, 2009
Ruffled Flower
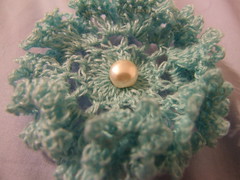
As promised last week - the Ruffled Flower!
MATERIALS
I used about 5gm (50m/55yds or so) of a cobweb-weight cashmere/silk blend, worked with a 2.75mm (C) hook. I used a 1cm (half inch) diameter spherical pearl button for the centre. The flower came out at 7cm (about 3 inches) diameter. Thicker yarn and hooks will produce bigger flowers.
ABBREVIATIONS
ch – chain
ss – slip stitch
sc - single crochet
dc – double crochet
tr – treble crochet
INSTRUCTIONS - British terminology
Row 1: Leave a long end, then ch3, ss to close
Row 2: Ch3 in place of first tr, then 27 tr into ring, ss into 3rd of beginning ch (28tr)
Row 3: Ch4 in place of first tr and ch, (skip next tr, tr into next tr, ch1) to end, ss into 3rd of beginning ch (14 ch-1 spaces)
Row 4: Ch4 in place of first tr and ch, (tr1, ch1) 4 more times into 1st ch1-space, then (tr1, ch1) 5 times into each ch1-space to end, ss into 3rd of beginning ch (70tr)
Row 5: ch1, work 2dc into each ch1-space to end, ss into 1st ch (140dc)
Row 6: ch5, ss to 1st dc, (ch5, ss to next dc) to end, ss to base of 1st 5-ch (140 ch-5 spaces)
Sew in ends, using the cast-on end to sew a gorgeous bead or button into the centre. Attach to a pin, or sew onto a top, shawl or evening bag.
INSTRUCTIONS - US terminology
Row 1: Leave a long end, then ch3, ss to close
Row 2: Ch3 in place of first dc, then 27 dc into ring, ss into 3rd of beginning ch (28dc)
Row 3: Ch4 in place of first dc and ch, (skip next dc, dc into next dc, ch1) to end, ss into 3rd of beginning ch (14 ch-1 spaces)
Row 4: Ch4 in place of first dc and ch, (dc1, ch1) 4 more times into 1st ch1-space, then (dc1, ch1) 5 times into each ch1-space to end, ss into 3rd of beginning ch (70dc)
Row 5: ch1, work 2sc into each ch1-space to end, ss into 1st ch (140sc)
Row 6: ch5, ss to 1st sc, (ch5, ss to next sc) to end, ss to base of 1st 5-ch (140 ch-5 spaces)
Sew in ends, using the cast-on end to sew a gorgeous bead or button into the centre. Attach to a pin, or sew onto a top, shawl or evening bag.
Subscribe to:
Posts (Atom)